Week 7 and 8
And here is another belated blog post! There will be one more backlog blog post coming, and then I am all caught up. As the last blog post, I am writing this post in retrospect.
#gitnightmare
I think anybody who ever touched git have an episode or two to share under the hashtag. In this three months, I learned about git as much as coding itself. And some of the biggest lessons came from placing myself in deep git confusion. In this blog post, I want to revisit the mess I created and try to understand what each of the git commands I came across do (and what they actually do).
Context
As I mentioned in the previous blog post, there were a couple of weeks when I was not in close touch with my supervisors. I was working on a couple of issues. One was to contribute information about multiple councillors at once.
First I was looking into the gem called cocoon that enables adding nested forms. We ended up not using this gem because it is javascript dependent, and we wanted to create the form that works in the environment where javascript is not enabled.
Second, I created a form that uses #edit and #update controller actions. The idea is that every time the user is clicking the “Add more councillor info” button, it makes an edit request for the submission they are making, and adds more councillor information. To me it felt like the simplest thing to do at the moment, but in reality, the controller is bouncing the submission back and forth between #edit and #update, and at one point it gets too confusing.
So we decided to only use the #new and #create controller actions. When a user clicks “Add more councilor”, conceptually we are pushing the new councillor info in an array of councillor contribution, and when it is submitted, the items in the array share the same councillor_contribution_id. That is one context. I call it an issue A.
The other thing I was working on was the issue of creating a step-by-step guide for the councillor information contribution process with a user without technical knowledge in mind. In the github issue page, I drafted out the guide, and we were at the point of discussing which parts of the guide can be automated.
The general contribution steps I drafted were:
- Google search the council website
- Find the page with the councillor contact information
- Copy and paste the councillor’s name and email address
- Submit the information
It sounds simple enough, yet there are a lot of things that are very specific and need to be very clearly communicated. For example, the name needs to be capitalized only for the beginning of the first name and the last name, and titles like Lord Mayor, Deputy Mayor, Alderman, Cr., should not be included in the submission (also I never knew there are so many titles in the council). In this case, we could use validation to automate the process, yet validation by itself is not enough when we follow our design principle. It is important for the contributor to feel supported and welcomed throughout the process.
Other possible automation is the very first step in the contribution, to google the council website. Currently, in the csv file where we manage the data of the councilors, there is a column for the council website. We use the csv_to_popolo gem to convert these data, and we can convert the council website information in json format. That means we can create a directory of council websites that we have kept track of. Great idea! And this is the issue B.
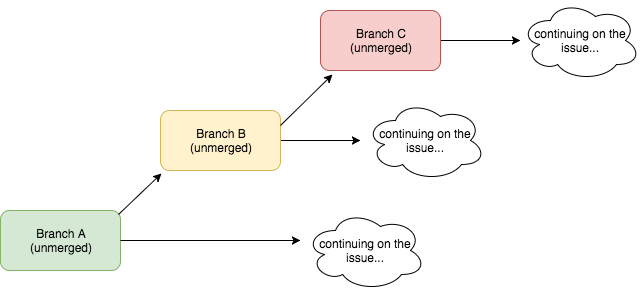
My first step into the git nightmare is that I branched off from issue A to work on issue B before the issue A pull request was merged. This is part because I did not know what to do while I waited for the review of my issue A pull request, and yet the implementation of issue A is very important in creating a directory of council websites. So I anxiously git checkout –b from the unmerged issue A branch.
In the issue B branch, I created a haml file for the lengthy step-by-step contribution process. Creating instructions by itself doesn’t require a lot of coding, so I finished writing it relatively smoothly, and then wanted to keep going. So what I did is branch off AGAIN from unmerged issue B branch, and started creating a directory of council websites.
This is the disaster in making diagram:
Lessons learnt:
Small commits for pointed Pull Request
A layer of this git nightmare is that all of my PR had some potion of overlapping commits, and these commits made each PR so massively big. It is true that once the branch A is merged to the master, the commits shared between branch A and branch B would disappear on branch B, and makes the number of commits smaller. However, it is very rare for me to have my PR merged without some back and forth refactoring, and it results in merge conflicts of other branches.
To avoid this, I learned to make smaller PRs that are targeted to solve explicit single issues. In that way, each PRs are isolated and not dependent on each other.
Even though every time I think about “target to solve a single issue” it makes me giggle because it makes me think about the famous Audre Lorde quote “There is no such a thing as a single-issue struggle because we do not live single-issue lives”, which I wholeheartedly agree with, but in the case of github issues, single issue approach is the way to go.
Good commit messages save you
Small commits with explicit commit messages saves life, because when you have to dive into the deep sea of commits, you need to see exactly what you are looking for in very clear message, otherwise you will drown. I learned this lesson from enough time of git reset, git rebase, and the most definitely in my attempt to git cherry-pick.
Much more often than I thought, I need to go back to see other PRs and their commit history, to see the design decision, similar code to learn from, etc. And having a clear commit message helps a lot to find what you are looking for.
Some git commands I learned better
I used a lot of git reset, git revert, and git rebase. I was using it interchangeably to some point, but then I learned more about what each command do and what it is good for.
Git reset
Git reset goes back in time of the commit is made. It is a time machine you can go back in time to when everything was going well and you did not make any mistakes. I ended up using a lot of git reset.
Git revert
Git revert does the same thing as git reset, except the commit history will show that you used git revert. In git reset, nobody will know that you might have had 200 commits and decided to roll back the 200 commits, whereas in git revert, it will make a commit says “Reverted “all my 200 commits now I want to cancel””.
Git rebase
Git rebase confused me for quite a bit. From what I understand, git rebase combines the commits in 2 different branches. What git rebase does is essentially the same as git merge. The difference of git rebase and git merge is that you get to write commit messages in retrospect.
When you merge a branch, there will be a clear commit that indicates you merged the branch with another branch. In case of git rebase, git will prompt you to create new commits which replace the original commits (both from your working branch and the other branch you are rebasing too). So it is entirely possible to pretend like you worked on these commits in one branch, and cannot differentiate which commits are from which branch.
Git history revisionist (not in a bad way)
For me it helps to think of git reset and git revert as a pair, also git rebase and git merge as another pair. In both cases, the commit history differentiates one from the other. Git reset and git rebase are like history revisionist of the git revert and git merge, because former group will let you write commit message in retrospect, and do not leave an evidence that once the version of the branch was farther ahead in different direction. Whereas git revert and git merge, there will be a commit that clearly indicates the commit was reverted and the branch was merged.
I ended up using a lot of git rebase because I liked the sense of starting over with clearer vision and leaving the messy commits behind. Probably git revert is one step more transparent in the version control.
Although I am using the term history revisionist in a bit of sarcastic humor, I do not want to throw a shade on git reset and git rebase. There are cases that the git history revision is beneficial.
For example, there is a time you need to git commit not because you moved forward but because you just have to, such as, going for lunch, your laptop is about to die and you have no charger etc. In my case, I needed to make a lot of commit because my test was failing only on Travis CI when I pushed commit, but not locally. I made numbers of commits with messages like “testing if Travis CI passes this test without variables” “Deleting the id from this table to see if travis CI will give a different error” “Changing order of unit tests to see if Travis is acting up because of randomized order”.
After solving the problem, those commits are not necessary, so I can git rebase those commits to write commit messages in retrospect.
Lessons learnt:
- Small commits for pointed Pull Request
- Good commit messages saves you
- Using git reset, git revert, and git rebase when things go wrong
I tried my best to describe my git journey here, but it is a confusing thing by nature. For next post I will write more about our project progress and learning web scraping!